We decided last week that although the webasto central heating does a wonderful job of heating the boat, it DOES hammer the batteries - despite what it says in the manual.
SO, on Thursday night after work, I began to construct a surround/hearth in accordance with the Soliftec guidlines: http://www.soliftec.com/Boat%20Stoves%201-page.pdf
I began by putting the stove in the place we decided it would go in - then moving it as it would be directly in the way of the lighting wire loom on the plan!
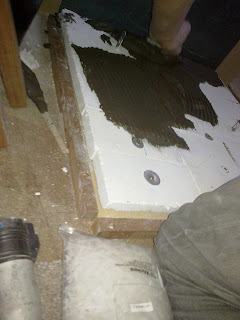
Having compromised on the position, I marked out on the floor where it needed to be and then cut a hole through the floor and used self tapping/self drilling screws to attach 2 angled brackets to the underfloor bearers. Having done that, I then screwed down some board over the whole area to give it a bit of height. On top of that, I put down some scraggy bits of ply to create a 10mm air gap and then fitted some of the heat proofing -I'd already bought the 25mm calcium silicate board (which has been rolling around in the back of my jeep for the last few weeks making a mess). I was sceptical of whether it would be strong enough to hold the weight of the tiles... (which ended up being ex display in our local depot - NOT our first choice but the only ones they had in stock on Saturday morning when we went shopping) but once the tile adhesive was lathered all over it, they seemed to be fine - it was dry within a couple of hours and we could lift the stove into place.
Cutting the holes in the tiles was a pain - I got through 5 "tile drill bits" and various other drill bits - AND ended up resorting to an old tile saw to enlarge the the holes to accommodate the brackets.
I made a simple surround using left over bits of sepelle from the track I've been making at work - partly because it's a strong hard wood, and partly because it doesn't burn very easily ... I know this from repeated attempts when I've been grinding metal nearby lol.
Once in position, I marked (roughly ish)the centre point of the output and then using a bit of wood until it "looked" straight, the corresponding point in the ceiling...
Having then measured it, you can see I was a bit slopey on the first attempt lol.
NO matter - I got brave and drilled my guide hole out through the roof!
This was about 10.30...
It all started out SO well - my little cordless jigsaw making light work of the circle... that was until I hit the 5x50mm box bracing section across the boat... slap bang in the middle of where the hole needed to be... My heart sank as I snapped the first couple of jigsaw blades... followed by many drill bits .
Perseverance was the key though and having flattened 5 batteries trying to enlarge the eventual hole with my cordless angle-grinder (and subsequent trip to screwfix to buy a corded one to complete the job) by 2pm, it was done! - NOTE how close I came to beggaring up the wires that were NOT on my wiring diagram - the builder must have ignored needed to deviate .
IT was by now of course raining too!
Amazingly, when I got the flue and fed it down through the hole, it lined up perfectly with the stove underneath... even though I was sure I'd measured it properly, I have to admit to being fair amazed it was right lol.
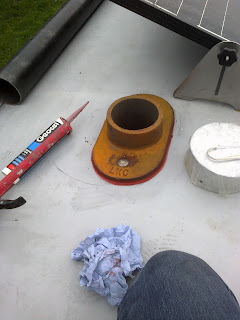
I sealed it up with a combination of heat proof silicone and sikaflex I had left over - sikaflex doesn't claim to be heatproof but it's very good stuff and I used it around the bolts too.
Having put some fire-rope around the blanking plate on the rear, I decided to put flexible (well that's what it says on the tube) fire-cement in there too.
Once the flue was nicely sealed up, I went back on the roof and wedged the flue into the collar with more fire rope, more fire cement and topped off with the flexible heat proof stuff again... that should cover every eventuality lol.
Before lighting it, you may note I got a couple of fire-extinguishers to hand - there was no need. It lit easily and in no time was up to temperature... well when I say temperature, we were aiming for a "gentle fire" to cure the cement etc... within no time however, it was over 30 degrees in the cabin and we spent the rest of the evening watching tv in our pants, with the windows open!
Bliss.
Until next time...


10 comments:
The stove looks great. Your making good progress with the fit out. Well done
Cheers - it doesn't bear up to close scrutiny but it'll do for us lol.
btw- you don't have an use for a sloping mirror do you? - 90 degree angle to the bottom right (see photo over the sink) as I messed up my order and got 2 the same of the wrong side if you follow.
That looks a very professional job!
Thanks for the offer. Vicky ensured we had a full compliment of mirrors so we wouldn't have a use for it.
loving this blog
I'm guessing "lol" is ironic here as I can't imagine much laughing going on until the job was complete
Heather
for a ginner yes ;-)
Cheers - we've very pleased with it... in fact, I'm burning my toes as I type!
not really Heather - I cock up most things on my first attempt so am pre-disposed to "lol" at myself much of the time :-)
In fact, we're off down (at work that is) to Dreamland in Margate next week to dismantle the speedway ride for some repair work - no doubt I'll REALLY be "lol" out in the cold and rain ... NOT x
then it lived up to yr expectations didn't it? Heather
the tiles look fab and a really thorough job all round.. so there needs to be an airgap under the stove or was that your invention (or did i miss understand that part)?
I did put a (bit of an) air gap underneath as from what I gathered following the soliftec installation sheet, you should use the same principle as the surround using a 15mm board. As I only had the 25mm stuff, I thought I'd use it up. It all feels pretty solid and for such a tiny stove (rated at 4kw) it heats up the whole boat (57 ft) beautifully with with eco fan running.
Post a Comment